


Flight Academy 101: Introduction to Launching Swag Projects and the SwagUp Dashboard

In this article

So you just created your SwagUp account… but wait!
Before you can launch your first swag project, you’ve got to pass your Swagstronaut training! (We don’t want you running out of oxygen out there in space, after all)
But don’t worry. That’s what this handy dandy guide is for.
Welcome to Swagstronaut Academy 101. Let’s get started 😎
There’s a lot going on under the hood, and SwagUp is a powerful way to take how you’re using swag to the next level. But ultimately, everything comes back to the swag and the connections it helps you and your team make. And for that, you first need some stellar swag.
Part I: Introduction to Swag Projects
Your Swag Project Blueprint
There are 5 pieces to think about with a basic swag project.
And conveniently, we've turned those all into lessons in this Flight Academy 101 Guide.
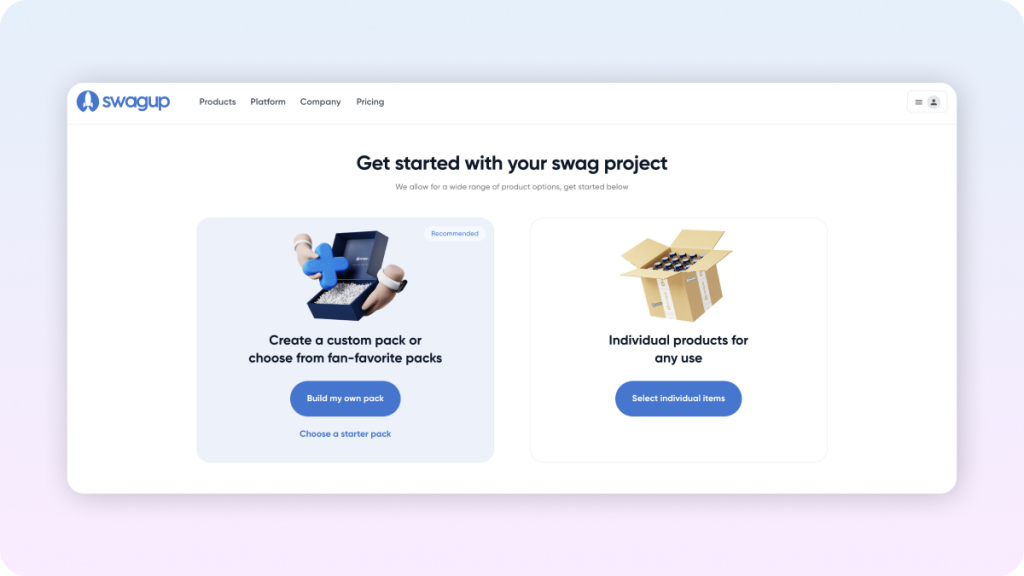
Lesson 1: Your Products
First, your products. In the catalog, you can pick the swag items and the packaging you want for your swag. (Adding your custom logo and having it all come together in a cohesive, on-brand design theme is also part of this step.)
🖼 Get swag pack mockups by submitting your picks to our designers via the catalog
Lesson 2: Production
Second, production. After you’ve configured your swag project exactly to your liking, SwagUp takes over the heavy lifting.
This includes:
- purchasing inventory
- adding your beautiful logo to the items
- Q&A, and finally
- putting together the swag pack in a way that feels like an experience (and not a mish-mash of swag someone dumped into a scuffed-up brown box)
A lot happens behind the scenes – how do you keep track of it all?
💡 Answer: Your SwagUp Dashboard!
While your swag is in production, you will be able to see order statuses in the dashboard.
Of course, there’s a lot more you can do in the dashboard (keep reading 😉)
Lesson 3: Distribution
Quiz time! How much is your swag worth?
Zero, if it’s just sitting on the shelf (Ok, ok, trick question— sooorry).
So let’s talk about Distribution. Using your dashboard, you will be able to upload recipient information and directly ship swag to them.
Here are the two most common approaches to distribution in the swag project process:
- Ship immediately
As soon as your swag finishes production and passes our Q&A process, it will be available in your dashboard as inventory you can ship to any dashboard contact.
Why this might be GREAT for you: No storage fees (because you’re shipping right away!)
Why this might NOT be for you: No swag inventory for use at a later date - you will need to order more by starting a new swag project - Store, then ship as needed
Don’t need to send swag just yet? Want to be able to offer swag options to potential recipients? You might prefer to store your swag first, and then distribute it as you go.
Why this might be GREAT for you: Accurate picture of swag inventory at your disposal, ability to automate or manually approve swag distributions
Why this might NOT be for you: One-time warehouse storage fees for your packs and individual items until they are shipped out
If your swag is for a predetermined group or event (e.g. executive leadership team, company retreat, industry conference) where you have a good idea of who needs swag and how many people will need swag, shipping immediately is a good choice.
If your swag is more general purpose, or part of an ongoing process (e.g. new hire onboarding, community swag giveaways), storing and then shipping as needed is a good choice.
But wait, can’t I just do both?
YES, yes, you absolutely can!
Just make sure you order enough swag to cover both your immediate shipments, and the amount of swag you would like to have in inventory as storage. And don’t worry about running out - when your stock starts to get low, get a head start on reordering to avoid any disruptions to your swag supply!
Lesson 4: Inventory and Storage
So you want swag on hand to send to your newest hires and employees celebrating work anniversaries. How does inventory and storage work?
Everything you need is available in your dashboard.
Your dashboard gives you the ability to know how much and what swag you have in your arsenal. That way, when you have a specific use case come up, from in-person events to swag rewards to onboarding new hires, you will be able to leverage your swag quickly (no scrambling to see who’s holding onto the swag, and if there’s enough swag to actually use).
Lesson 5: Reordering
Hot swag goes fast! Before you know it, every team will be wanting to know how to get a piece of the swag pie, and the inevitable result is an empty inventory.
Unless, you reorder. Here’s how.
Inside your dashboard, you can place a new order to replenish your inventory, or you can explore the catalog to add new swag products and designs to your company swag arsenal. Starting a new swag project is also a great way to launch a brand redesign with some flair and fun :)
Summary: The 5 Steps of Launching a Swag Project
- Choose Your Products
- Approve Swag for Production
- Manage Distribution
- Track Inventory
- Reorder As Needed
And, good news!
SwagUp simplifies that even further: Create, Automate, Distribute
- Create. Think curated swag catalogs, Swag Expert help with ideation and sourcing, professional mockups and designs, making this piece a walk in the park.
- Automate. Swag is fun, but it can be extremely time consuming- especially if you're doing each individual piece manually. Luckily, as an API first platform, we help you automate and eliminate the drag on your swag. From convenient, one-touch redeem pages to integrations with Salesforce, Rippling, and more to a fully functional API, there's a lot to tap into here. Ask your Swag Expert if you need help getting started.
- Distribute. Ship globally and manage it all in your dashboard. Store what you don't need to ship right away. Work with partners and sponsors for all your events and VIP client/member appreciation needs. Yes, it's that simple - as it should be.
This is what the SwagUp dashboard helps you master (and even if you’re not looking into automating just yet, it’s already built into your account, ready for you to leverage when the time comes.)
Now you know the pieces of a basic swag workflow, let’s look at the dashboard.
Part II: Anatomy of the SwagUp Dashboard
The Dashboard consists of six tabs in the main window with additional settings under the dropdown menu of your profile.
Let’s go over each of the six tabs.
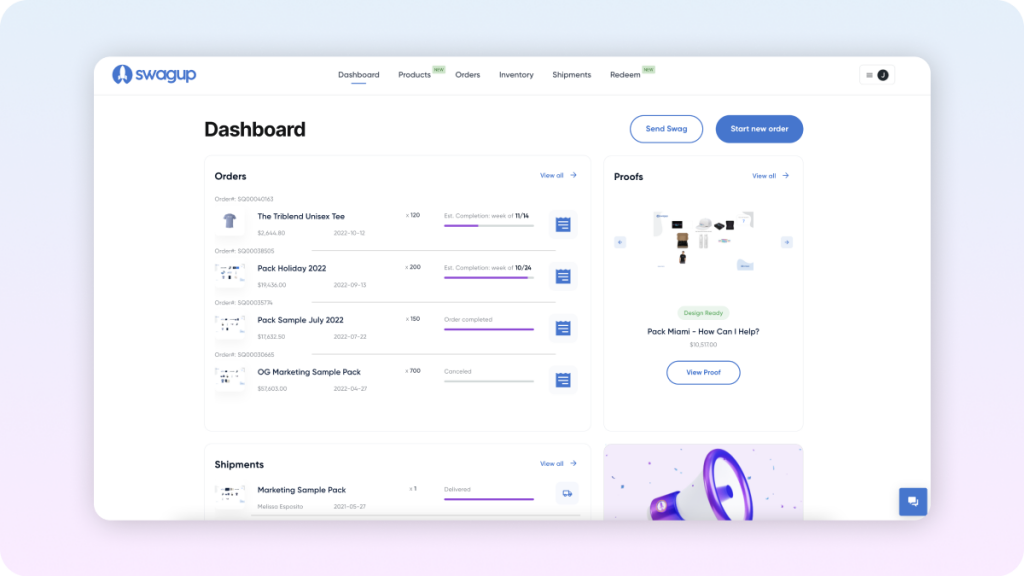
1. Dashboard. Think of your Dashboard tab as your Swag Command Center. This tab gives you the big picture view of everything happening in your account.
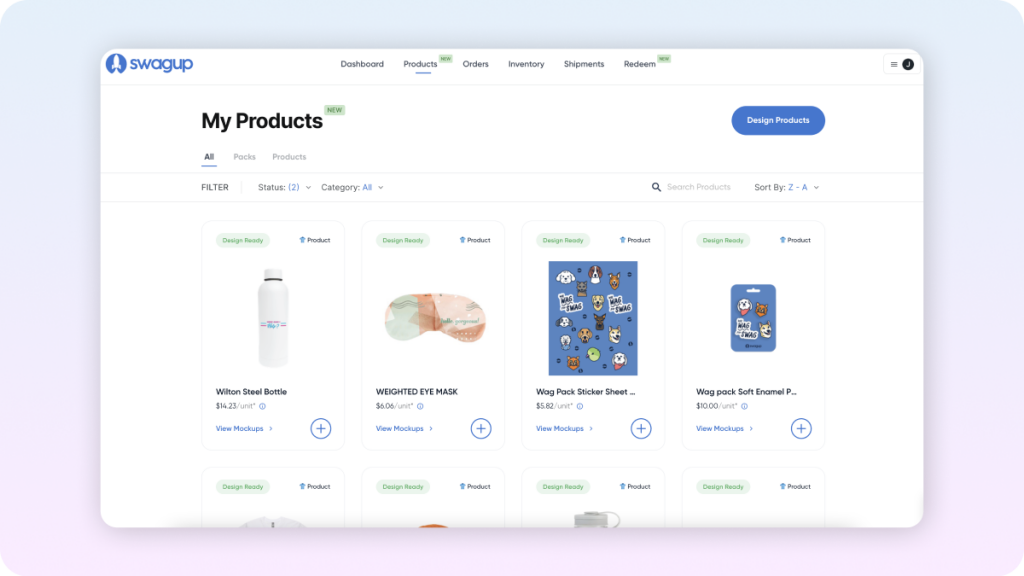
2. Products. Your Products tab is where you can see all the swag designs you’ve created through SwagUp, making it easy to launch new swag orders from previous designs (or ideas!) at any time.
3. Orders. Your Orders tab is where you can see the swag projects you have started, as well as the ones you have completed.
4. Inventory. Your Inventory tab is where you can see what and how much swag you have for use.
5. Shipments. Finally, your Shipments tab is where you can track the status of swag you have shipped out to your uploaded contacts in the dashboard. Upload new contacts and send out swag shipments from this tab when needed.
6. Redeem Pages (NEW!) One of our most exciting additions in 2022, the Redeem Pages tab in the Dashboard is actually a 2.0 update to a very early customer solution we offered in the early days of SwagUp. And through many (and frankly, painful) iterations, we're excited to share the massive improvement that the Redeem tab, a native part of the SwagUp dashboard offers SwagUp users like yourself. TL;DR Redeem pages are the simplest way to send swag to recipients around the globe.
Hold up…what about adding new swag products?
Good question – and we love that you’re thinking ahead. Whenever you want to add new swag products (even if it’s just the same product with a different design) you can add it to your dashboard by visiting the catalog and starting a design request for the product(s) you’re interested in.
The catalog is regularly updated with trending and popular products, and stock can go fast, so we recommend taking the initiative to collect a product you like by starting a design request on it as soon as it catches your eye.
Finally, you will be able to manage your company account and billing details by clicking on your profile icon in the top right corner:
Alright, let’s review what we covered:
- The 5 pieces of a basic swag workflow
- How the SwagUp platform helps with that workflow (hint: Create, Automate, Distribute)
- What each tab in the Dashboard offers
- How to navigate your way around your account
That concludes your basic training. You’re now ready to start your own swag project!
*Note: this guide focuses on swag packs for your swag project, but the process is essentially the same for ordering individual swag items. With individual swag items, start on the bulk catalog instead of the custom pack catalog. Skip the packaging category (unless you plan to package the items yourself). This option is usually better for conference and event swag items that you do not need a nicely assembled swag pack for.
Still undecided? Explore our preset packs to get ideas on what your dream pack could look like.
.png)
.jpeg)
.png)

